
- I'll have a recording I can look back on for ideas of how to improve next time.
- It will serve as an addition to my digital portfolio.
- I will provide attendees the "rewindable"option of re-watching my session for ideas they might have missed or want to review.
- I can provide people who weren't able to attend the opportunity to hear what I had to say. We all check presentation slides from conference sessions we didn't attend, but that doesn't really tell us what the speaker actually said. A recording of the session is a lot more valuable.
If you are presenting a session at a conference, consider recording it. One easy way to record your session is with Google Hangouts on Air. When you do that, your session will automatically be loaded to YouTube for easy sharing. And, you will have the option of sharing the recording just with people you send the link to, or making it public for anyone on YouTube to find.
Here's how you can set up, record, and share your session with Google Hangouts on Air. And, these instructions also apply if you would like to record lessons you teach students. When you record your lessons, you can post them online for student review and for those students who were absent.
One caveat: Only attempt this if you are getting good internet reception and your computer is performing well. Otherwise, you will make a slow connection and poor computer performance worse, leading to frustration both for you and your attendees.
Before your session:
Before your session:
- At any time before your session, go to https://plus.google.com/hangouts/onair?hl=en (You can also get there from hangouts.google.com by opening the
menu at the top left and select Hangouts on Air.)
- Click Create a Hangout on Air.
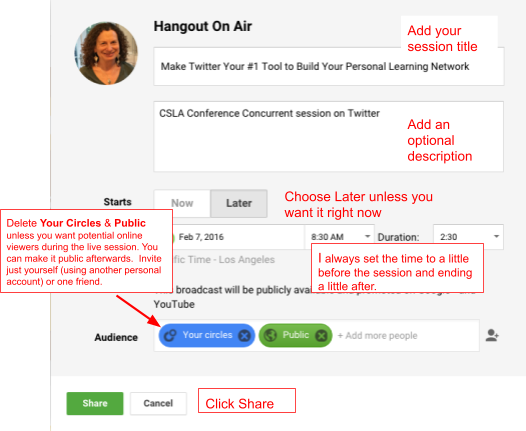
- Fill out the dialog box that appears:
By removing the Your Circles and Public options from the Audience, you can keep the hangout private during your recording and switch it to public after the recording is complete and you know you are comfortable with it. If, though, you want to make your session publicly available while you present, keep the default Public option. In any case, you need to invite at least one person to your session in order to proceed and select Share.
Just before your session:
- For the best performance, restart your computer and avoid loading or running any unneeded programs until you finish your session and recording.
- Go to Plus.Google.com and select Events on the left. Find your event and click the title. You will now see a screen that looks like this:
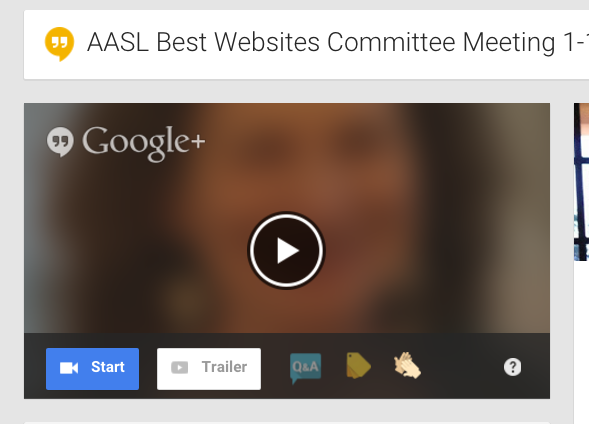
- Click the blue Start icon.
The Hangout will load in a new tab or window. You will see a prompt box reminding you that you will be on air, asking if you want to restrict access to people under 18, and asking if you want to invite people. You can just click Skip to proceed.
The hangout will take a few moments to fully load. Once it does, you will see a green Start Broadcast button at the bottom. (Note that you must enter the hangout through the Events link and with the account you used to establish the hangout and, or you will not have access to the Start Broadcast option.)
- Once the session begins, click the Start Broadcast Button. Note that you cannot start the broadcast, stop it, and start again, so make sure you are ready to record when you click Start Broadcast. (If there are gaps in your session you don’t want on air, you can edit them out later in the YouTube editor.)
- Stand in front of the camera on your computer and introduce yourself, so that the viewers of the recording get to see you. If you are using a presentation slides, you can then switch over to screen sharing for the rest of the session.
- To screen share, hover your cursor on the left edge of the hangout window to display a series of icons, as in this illustration:
- Select the Screen sharing icon. You can select to share your entire computer if you will be moving to different windows and files, or you can share just one window if you are using just one.
- At the end of the session, click Stop recording.
After the session:
- At any time after the session, go to YouTube.com. Select My Channel on the left, and then Video Manager at the top of the next screen display:
You will see your video listed, as in this example:

- Clicking the title of the video will take you to play mode. Click Edit to make any edits or enhancements, such as editing out any unwanted footage at the beginning or adding annotations. The Edit screen will also allow you to change your video from Unlisted to Public, from the drop-down in this illustration:
If you make the recording Public, it will be searchable on YouTube. If you keep it Unlisted, you can share the link with others, but it won’t be searchable.
- Copy the video share link to share your video with others.
So, go for it! Record your presentations - or lessons - and share them widely!


Great information. I enjoyed it.Add more imaginative writing tips in your blog.
ReplyDeleteThis comment has been removed by a blog administrator.
ReplyDeleteThis comment has been removed by a blog administrator.
ReplyDeleteHi ,to every one, it’s really a nice for me to pay a visit this site, it includes useful Information. Thanks a lot for sharing with use! Great
ReplyDeleteWow!
ReplyDeleteamazing thank you very much.....
This comment has been removed by a blog administrator.
ReplyDeleteThis comment has been removed by a blog administrator.
ReplyDeleteThis comment has been removed by a blog administrator.
ReplyDeleteYeah, this is a great way of solving that problem, thanks a lot. In my presentation I also very often use a google slide themes https://poweredtemplate.com/google-slides-themes/ cuz it looks really great and helps to better perceive information.
ReplyDeleteThis comment has been removed by a blog administrator.
ReplyDeleteThis comment has been removed by a blog administrator.
ReplyDelete